Calendar
|
|
July '24 | |||||
| Mon | Tue | Wed | Thu | Fri | Sat | Sun |
| 1 | 2 | 3 | 4 | 5 | 6 | 7 |
| 8 | 9 | 10 | 11 | 12 | 13 | 14 |
| 15 | 16 | 17 | 18 | 19 | 20 | 21 |
| 22 | 23 | 24 | 25 | 26 | 27 | 28 |
| 29 | 30 | 31 | ||||
Quicksearch
Syndicate This Blog

Categories
Blog Administration
Powered by
Lizenz/License
Der Inhalt dieses Blogs ist © Copyright 2009 Ralf Ertzinger. Jegliche Reproduktion und Wiederverwertung nur mit schriftlicher Genehmigung des Autors.
The content of this blog is © Copyright 2009 Ralf Ertzinger.
Sunday, March 21. 2010
Building a multi OS USB boot stick, Part 1 (Windows)
Among the things I carry around is always a collection of USB sticks, for various purposes. One of those is usually dedicated to a Linux rescue system, in order to get somehow broken systems back on their feet.
While it is possible these days to access non Linux systems from a booted Linux system any repair work beyond simple text file editing and file copying usually requires OS specific tools to get the job done. Thus it would be nice not only to have a Linux rescue system at hand, but a Windows one as well. And Solaris, while we're at it. And possibly some more.
USB sticks are cheap, at least in this part of the world. 10EUR will get you 4GB off the shelf in almost any electronics store, a little more money will get you 8GB ordered online. So space is not really an issue.
Actually installing an operating system in a way that allows it to boot off a removable media requires some specific preparations and tools in each case. This means that a running instance of that specific OS is needed to prepare the installation. This means that to get Windows to boot of an USB stick a running Windows installation is needed. The same goes for Solaris and Linux.
Preparations
The USB stick used for this exercise is a 4G Sandisk. This procedure will delete all data currently on the stick, so either make sure there is nothing of any interest on it, or just get a new one.
The initial plan is to have Windows, Linux and Solaris boot off the stick. Each OS will get it's own partition, to keep possible clashes between the files of each system to a minimum (and because Solaris wants and UFS partition, but more on that later).
Installing Windows on USB
The standard Windows installer does not allow for installation on USB devices. The standard tool for those tasks is BartPE, a free tool to create so-called Preinstalled Environments. Those are actually a Microsoft supported way to preinstall an operating system on a PC, which is used by system builders to deliver machines with the OS already installed but not registered. The Microsoft tools to create these environments are not easily available, though, and this is where BartPE came in a few years ago. It's original purpose was to create Live CDs of Windows, but booting from USB was added (experimentally) later.
While BartPE is a very valuable tool there is an even better one for this special purpose: The Ultimate Boot CD for Windows, which is basically a BartPE with a lot of useful tools already tacked to the side, and a completely reworked USB installer.
To use UBCD the following is needed:
- The UBCD installer, which weighs in at 255MB and is available from the projects site
- A Windows XP install CD (32 bit)
- Service Pack 3 for XP, if the Windows CD does not already include it
- A license for the Windows version (this is more a legal than a technical problem, but the Windows install on the USB stick needs a separate license to be legal)
- Drivers
The last point is especially interesting. UBCD will take all drivers whichare contained in the Windows XP install CD, which, as everyone knows who tried to install XP on a reasonably recent machine, is not exactly much. While the USB installed will boot (hopefully), access to hard disk drives on the machine or access to network interfaces may be severely limited due to missing drivers.
UBCD already comes with a largeish selection of updated drivers for mass storage, LAN and WLAN, so simply building an image with the default settings has a good chance of working on a large number of modern machines (although the WLAN drivers are disabled by default).
Install procedure
- Make a copy of the Windows XP CD (that is, just copy all the files on it into a folder on the hard disk drive)
- If the CD did not already contain a Windows copy patched to SP3 download the SP3 install package from Microsoft, and slipstream the Service Pack into the copied files
- Install UBDC
- Start UBCD and enter the path to the copied Windows CD in the first field
- Set Media Output to None
- Click "Build"
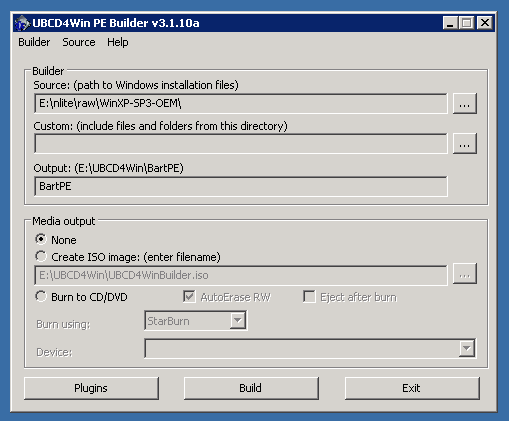
This will start a build process with the default settings, which are reasonable for a first build. UBCD is very customizable, most of the options are available by clicking the "Plugins" button on the main screen. Describing the various things that can be done here is beyond this text, but the UBCD home page has details on this.
After the build has finished plug in the USB stick and start ubusb.exe from the UBCD install folder. To make things easier make sure no other USB mass storage devices are connected. Set the options to match those in the screenshot below. Specifically:
- Make sure the right USB device is selected
- Set the partition size to 2048MB (or 2GB)
- Set the file system to FAT32-LBA
- Set the Boot Loader to grub4dos
- Select the right BartPE folder (although it should pick up the correct one automatically)
- Don't create a CD image

Clicking "Go" will start the process of repartitioning, formattingand copying of data to the USB stick. This may take a while.
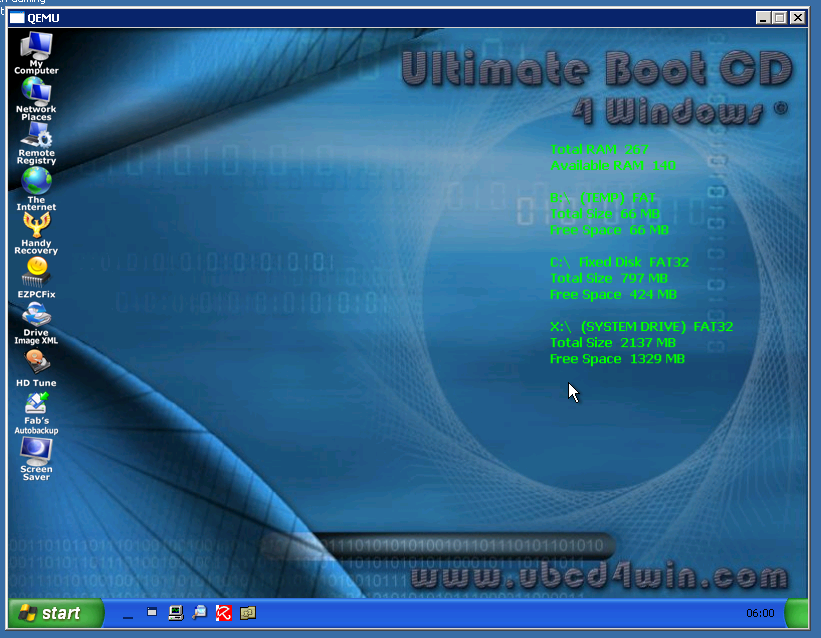
After the process has finished (hopefully successful) the resulting USB stick can immediately be tested, because UBCD comes with a copy of qemu, which can emulate a PC. Just click the "Test USB" button, and a virtual PC will try to boot off the USB stick just created.
One down, two to go.
Wednesday, December 30. 2009
Adding new dynamic library dependencies to an existing object
Due to some developing I needed a "lighttpd":http://www.lighttpd.net with modmagnet enabled. modmagnet is a module which allows inserting of lua code into the request processing stream. This is a cool feature, and I was pleased to see that
- lighttpd is on the standard Solaris install DVD
- mod_magnet is provided
Of course there is this small problem:
2009-12-29 23:29:31: (plugin.c.165) dlopen() failed for: /usr/lighttpd/1.4/lib/mod_magnet.soi
ld.so.1: lighttpd: fatal: relocation error: file /usr/lighttpd/1.4/lib/mod_magnet.so:
symbol luaL_checklstring: referenced symbol not found
What this means is that there are unresolved symbols remaining in the code after the dymanic loader has done it's work, which should not happen. Let's look a the dynamic deps of the module.
$ ldd /usr/lighttpd/1.4/lib/mod_magnet.so
        libsendfile.so.1 =>      /lib/libsendfile.so.1
        libm.so.2 =>     /lib/libm.so.2
        libresolv.so.2 =>        /lib/libresolv.so.2
        libnsl.so.1 =>   /lib/libnsl.so.1
        libsocket.so.1 =>        /lib/libsocket.so.1
        libc.so.1 =>     /lib/libc.so.1
        libmd.so.1 =>    /lib/libmd.so.1
        libmp.so.2 =>    /lib/libmp.so.2
        libscf.so.1 =>   /lib/libscf.so.1
        libuutil.so.1 =>         /lib/libuutil.so.1
        libgen.so.1 =>   /lib/libgen.so.1
        libsmbios.so.1 =>        /usr/lib/libsmbios.so.1
Judging from the name of the missing symbol luaL_checklstring it ought to come from some kind of lua library. But the listing above does not show any missing libraries, lest of all a lua one.
So what happened?
Somehow (and I have no idea how) Sun managed to build a mod_magnet without linking it to the lua libraries at the end. Simply speaking, this is broken.
Fortunately there is a way to fix this. Sun provides a utility called elfedit(1) which allows the editing of ELF file headers (like shared libraries). The lua library which provides the missing symbols is called liblua.so (no version information). The type of record in an ELF header which denotes the dynamic libraries needed is called DT_NEEDED. elfedit(1) takes two parameters: the file to edit, and the file into which to write the modified version.
First show the existing DT_NEEDED records.
$ elfedit mod_magnet.so mod_magnet2.so
> dyn:value DT_NEEDED
     index  tag                value
       [0]  NEEDED            0x5f9               libsendfile.so.1
       [1]  NEEDED            0x60a               libm.so.2
       [2]  NEEDED            0x614               libresolv.so.2
       [3]  NEEDED            0x623               libnsl.so.1
       [4]  NEEDED            0x62f               libsocket.so.1
       [5]  NEEDED            0x5d3               libc.so.1
This is basically the same list as above, with liblua.so notably lacking. Now add a new entry:
> dyn:value -add -s DT_NEEDED liblua.so
     index  tag                value
      [34]  NEEDED            0x63e               liblua.so
Now look at the new table, and save it.
> dyn:value DT_NEEDED
     index  tag                value
       [0]  NEEDED            0x5f9               libsendfile.so.1
       [1]  NEEDED            0x60a               libm.so.2
       [2]  NEEDED            0x614               libresolv.so.2
       [3]  NEEDED            0x623               libnsl.so.1
       [4]  NEEDED            0x62f               libsocket.so.1
       [5]  NEEDED            0x5d3               libc.so.1
      [34]  NEEDED            0x63e               liblua.so
> :write
> :quit
Looking at the ldd(1) output, just to be sure.
$ ldd ./mod_magnet2.so
        libsendfile.so.1 =>      /lib/libsendfile.so.1
        libm.so.2 =>     /lib/libm.so.2
        libresolv.so.2 =>        /lib/libresolv.so.2
        libnsl.so.1 =>   /lib/libnsl.so.1
        libsocket.so.1 =>        /lib/libsocket.so.1
        libc.so.1 =>     /lib/libc.so.1
        liblua.so =>     /usr/lib/liblua.so
        libmd.so.1 =>    /lib/libmd.so.1
        libmp.so.2 =>    /lib/libmp.so.2
        libscf.so.1 =>   /lib/libscf.so.1
        libdl.so.1 =>    /lib/libdl.so.1
        libuutil.so.1 =>         /lib/libuutil.so.1
        libgen.so.1 =>   /lib/libgen.so.1
        libsmbios.so.1 =>        /usr/lib/libsmbios.so.1
Now the linker picks up the lua libraries. If the modified modmagnet.so is now put back into /usr/lighttpd/1.4/lib, lighttpd will start and modmagnet will work.
Now, this wasn't so hard, was it?
Friday, December 25. 2009
Changing the rpool disk in Solaris
Ever since my storage system was built there was one thing that annoyed me. The 2.5" hard disk drive that houses the operating system itself was lifted from an old notebook and had the annoying property of parking it's heads after five seconds of inactivity. Since ZFS writes to the disk quite often and regularily this led to a constant cycle of parking and unparking. This was certainly not helping the disks life span, it made an annoying noise and it caused small system hangs whenever the disk had to unpark it's heads to read some data.
Under Linux one could use hdparm to instruct the disk to not park it's heads, but unfortunately a program mimicking this functionality seems to be absent under Solaris. Thus the plan to replace the disk with a different one which had a more sensible apporoach to head parking.
This turned out to be an interesting endeavour.
The general problem of replacing the disk holding the rpool is common enough that the excellent ZFS troubleshooting guide has a section on doing this. The general plan of action is as follows:
- Insert the replacement disk into an available slot
- Create a partition spanning the whole disk
- Create boot and data slices
- Attach the new disk as a mirror to the rpool
- Wait for the resilver to finish
- Install grub on the new disk
- Try to boot from the new disk
- Detach the old disk from the rpool
- Remove the old disk
This is all very sensible, and it all works as advertised. In my case there is, however, a last step not on the list above:
- Put the new disk on the controller the old disk was attached to
The reason for that is that the case I used only has one internal 2.5" hard disk drive slot. The new disk was prepared using an external USB-IDE converter module. This worked just fine, the BIOS is even able to boot from the USB disk. As long as the new disk remained attached to the USB converter everything was fine, even after the old (internal) disk was removed from the rpool. But putting the new disk into the case caused Solaris to roll over and die early in the boot process due to not finding it's rpool disk. The error message indicated that it was trying to read the pool from the external USB device (which no longer existed at this point).
Investigation (and much swearing) turned up that this information was passed by GRUB to the Solaris kernel.
Solaris uses a patched GRUB version which understands ZFS and has some string replacement magic built in. Every (non failsafe) boot entry contains a line similar to this:
kernel$ /platform/i86pc/kernel/$ISADIR/unix -B $ZFS-BOOTFS
$ZFS-BOOTFS is replaced by GRUB with the following information:
- The name of the root pool (usually rpool) and the number of the dataset that contains the root file system (there may be several BEs)
- The device path of the disk this GRUB instance was read from
The actual command line that is executed by GRUB thus looks something like this:
kernel /platform/i86pc/kernel/$ISADIR/unix -B zfs-bootfs=rpool/328 \
bootpath="/pci@0,0/pci8086,2942@1c,1/pci-ide@0/ide@0/cmdk@0,0:a"
The interesting part here is the bootpath parameter. This is the device that Solaris will try to mount the rpool from. Even if the rpool consists of several mirror devices, only one is used in the initial boot process. Where does GRUB get the device path from? It's read from the rpool header, from the disk GRUB was loaded from. Every ZFS pool disk contains the device path it was last found under. This usually does not matter much, a RAIDZ will still mount if you swap the disks around when the machine is off, but the boot process relies on the rpool disks not wandering around. My new disk still had the USB device path embedded, which GRUB read and passed to the kernel, which then failed to find the disk.
Fixing this turns out to be easy: boot into failsafe mode with the new disk on it's final connector. This will search for rpools and BEs on the system and offer to mount one of them. Pick the right one, reboot. This is enough to get the current (and correct) device path embedded into the rpool. The next (non failsafe) boot will thus pick up the correct device path and allow the boot to continue.
The morale of an afternoon thus spent in the innards of the Solaris boot process is thus: do not swap your rpool disk around.
Saturday, December 12. 2009
Creating a write only directory with SAMBA and ZFS
One of the intended uses of my OpenSolaris storage server was to serve as a "SAMBA":http://www.samba.org accessible data store. Part of that role was the wish to have an incoming directory modeled after similar directories found on many FTP servers. In detail this meant a share with the following properties:
- Readable for everyone (including unauthenticated users, i.e. guests)
- Everyone can create new files and directories on the share
- Only certain users can delete files and directories from the share
So everyone can add files to the share, but removing them requires special privileges.
It turns out that this is impossible to do with normal UNIX file system permissions, as for UNIX creating a file (which is a write operation on a directory) is much the same as deleting one (which is a write operation on a directory).
Fortunately OpenSolaris supports a much more powerful file operation permission language in the form of NFSv4 permissions.
It has been said that the NFSv4 permission system has been modeled after a smudged copy of the Windows NTFS permission system, and there is certainly merit to that claim, which is not a bad thing. The NTFS permission system is much more expressive than the standard UNIX system, as it has more actions (besides writing, reading and executing it also knows about deleting, for example), can support a large number of principals with different permissions and can actively deny an action (which is different from "not allowing").
h3. NFSv4 permissions
The NFSv4 system knows about the following actions:
|_. Action |_. Description for files |_. Description for directories | | read data | Read file contents | List directory contents | | write data | Write file contents (anywhere in the file) | Create new files | | execute | Execute file | Change into directory | | append | Append data to file | Create new directories | | delete | Delete the file | - | | delete child | - | Delete a file in the directory | | read/write attributes | Read/write basic attributes | (same as file) | | read/write xattrs | Read/write extended attributes | (same as file) | | read/write ACL | Read/write ACLs | (same as file) | | change owner | Change the owner | (same as file) | | sync | Use syncronous file access | - |
NFSv4 also contains a mechanism to specify actions that apply to a file or directory, and actions that are inherited to child objects of a directory (i.e. files or subdirectories). This allows very fine grained control of file system access.
Of special interest here are the bits about writing, appending and deleting files and folders.
The ACLs are maintained in a list of entries, each entry mapping a username/action pair to a verdict (allow/deny). Each access is matched against each entry in turn, and the verdict is taken from the first entry to match. So the order of entries is important.
Solaris' ls has two extensions to list those ACLs: -v for a verbose listing and -V for a concise listing. The format used by -V can be passed to chmod to change ACLs.
The permissions corresponding to the list of requirements stated above are as follows (/tank/share/incoming is the directory associated with the incoming share in smb.conf):
# ls -lVd /tank/share/incoming
drwxrwxrwx+  5 root     root           6 Dec 12 16:49 /tank/share/incoming
               user:sun:-w--dD--------:fdi----:allow
               user:sun:-w--dD--------:-------:allow
              everyone@:-w--dD--------:f-i----:deny
              everyone@:----dD--------:-di----:deny
              everyone@:----dD--------:-------:deny
              everyone@:rwxp--a-R-c--s:-di----:allow
              everyone@:r-xp--a-R-c--s:f-i----:allow
              everyone@:rwxp--a-R-c--s:-------:allow
#
There are two kinds of entries in this list. Those with an i in the second part of the action list and those without. The entries with an i are so called "inherit only" entries. They do not apply to the file or directory they are associated with, but are only inherited to new child entries. The other entries apply to the file/directory they are associated with.
This list can be read in three blocks:
The first block consists of the first two lines. The first line specifies that the right to delete files (d), delete child entries (D) and create new files/write file content (w) for the user named sun is inherited to new files and directories (fdi). This makes sure that this user can always remove files and directories, and overwrite existing file content in newly created files. The second line applies the same rights to the incoming directory itself.
The second block consists of lines 3 to 5 and contains only deny statements. They apply to everyone@, which means exactly what it says on the box. Lines 3 and 4 again deal with rights that are to be inherited to child objects, but the rights inherited to files and directories are different this time. Files inherit a deny to write anywhere in the file (w) and file deletion (dD). Directories just inherit the deletion part, otherwise new files could not be created in subdirectories (which needs the w right). The incoming directory itself gets the "no deletion" treatment as well.
The third block consists of the last three lines and restores some rights to non privileged users. Directories inherit the right to be read (r), changed though (x), new files and subdirectories can be created (rp), and attributes of all sorts can be read (aRc). We also allow synchronous file access (s). Files are much the same, except that the write anywhere right is missing. Not that it would matter much if that were allowed here, since it has been explicitly denied earlier. Note that the right to append to a file (p) is explicity allowed. The rights for the incoming directory itself (last line) again match those inherited to subdirectories.
Let's see if that works out.
$ id
uid=60003(smbnobody) gid=60003(smbnobody)
$ touch /tank/share/incoming/foo
$ ls -V /tank/share/incoming/foo
-r-xr-xr-x+  1 smbnobody   smbnobody         0 Dec 12 18:33 /tank/share/incoming/foo
               user:sun:-w--dD--------:------I:allow
              everyone@:-w--dD--------:------I:deny
              everyone@:r-xp--a-R-c--s:------I:allow
The unprivileged user smbnobody (SMB guest access is mapped to this uid) can create a new file in the incoming directory, and the file inherits the rights mentioned above (I signifies an inherited right).
$ cat /etc/passwd > /tank/share/incoming/foo
bash: /tank/share/incoming/foo: Permission denied
$ cat /etc/passwd >> /tank/share/incoming/foo
$
The user cannot overwrite the file (even though it is empty), but he can append to it.
$ rm /tank/share/incoming/foo
rm: /tank/share/incoming/foo: override protection 555 (yes/no)? y
rm: /tank/share/incoming/foo not removed: Permission denied
$
Deletion is also denied. Good.
$ id
uid=500(sun) gid=100(users)
$ cat /etc/passwd > /tank/share/incoming/foo
$ rm /tank/share/incoming/foo
$
However, the privileged user sun can overwrite and delete the file.
h3. Samba configuration
Samba also needs configuration to recognize and use the extended parmission system. The following is an excerpt from smb.conf, describing the incoming share:
[incoming]
        path = /tank/share/incoming
        writable = yes
        guest ok = yes
        browseable = yes
        public = yes
        acl check permissions = False
        ea support = yes
        store dos attributes = no
        map readonly = no
        map archive = no
        map system = no
        map hidden = no
        vfs objects = zfsacl
        nfs4: mode = simple
        nfs4: acedup = dontcare
This configures Samba to use extended ACLs using the ZFS (NFSv4) permission system.
Friday, May 29. 2009
Tracing errors through the code
Open source is a great thing. This becomes especially obvious if one is confronted with a program that refuses to work, and furthermore refuses to yield any kind of helpful error message. Reading the source may be the only way to determine what is actually going on.
Sadly I've been doing rather a lot of that lately, This post shall serve as an example how to navigate the Open Solaris source code in search of an answer.
h3. The problem
This specific problem arose during my experiments to create a small Solaris installation for use in an embedded system (small in this context means around 60MB used disk space). More details on this later.
The system has a cfgadm(1M) binary, but it does not work:
# cfgadm
cfgadm: Library error: Device library initialize failed: Facility is not active
As error messages go this only marginally better that "Failed", but not by much. Telling the user which exact facility is not active would have been helpful.
But at least there are some search friendly strings in there that may help to determine the source code responsible for this message.
h3. The source
One thing the classical UNIX source approach of "all the source in one tree" has going for it is that it makes searching in the source relatively easy. The Open Solaris web site has build a search engine above the source tree which automatically cross-references symbols in the code and has some other nice features. "The entry page to the search engine is here.":http://src.opensolaris.org/source
Searching for "Facility is not active" (note the quotes) yields just a handful of hits. One of those (in /onnv/onnv-gate/usr/src/uts/common/sys/errno.h) hints that there is a system error (and corresponding symbol) called ENOTACTIVE which belongs to this error message.
Running cfgadm under truss(1) confirms this:
# truss cfgadm
execve("/usr/sbin/cfgadm", 0x08047E24, 0x08047E2C)  argc = 1
[...]
sysconfig(_CONFIG_PAGESIZE)                     = 4096
open("/devices/pseudo/devinfo@0:devinfo", O_RDONLY) = 3
ioctl(3, DINFOIDENT, 0x00000000)                = 57311
ioctl(3, 0x10DF00, 0x08047460)                  Err#73 ENOTACTIVE
close(3)                                        = 0
[...]
Things go kind of downhill from there. So some code opens the devinfo device, runs two IOCTLs on in and the second one fails. Furthermore, truss only knows the first IOCTL by name, not the actually failing one.
Searching for the first name turns up /onnv/onnv-gate/usr/src/uts/common/sys/devinfo_impl.h:
#define DINFOIDENT (DIIOC | 0x82) /* identify the driver */
Looking around in this file some more yields two other definitions:
#define  DIIOC       (0xdf<<8)
[...]
#define DINFOCACHE  (DIIOC | 0x100000) /* use cached data  */
So the second IOCTL is actually called DINFOCACHE. Tracing IOCTLs through the code is, unfortunately, a bit tricky, because the routine that handles the IOCTL depends on the passed file descriptor (the first parameter to the IOCTL call). The file associated with the IOCTL in this case belongs to the file /devices/pseudo/devinfo@0:devinfo (see the open call directly above the two IOCTLs).
But since the IOCTL handling code most likely contains the symbol DINFOCACHE as well (that's what constants are for, after all) searching for the name will turn up the correct file, possibly buried among others.
Armed this knowledge the search results for DINFOCACHE can be narrowed down to one likely candidate: /onnv/onnv-gate/usr/src/uts/common/io/devinfo.c. This file belongs to the kernel code (it lives in usr/src/uts), and the name fits the name of the device opened above.
DINFOCACHE appears twice in a function called di_ioctl, which sounds good. Following the code flow through this function (DINFOCACHE is passed in the cmd parameter), the first relevant code part reads as follows:
if ((st->command & DINFOCACHE) && !cache_args_valid(st, &error)) {
        di_freemem(st);
        (void) di_setstate(st, IOC_IDLE);
        return (error);
}
(By the time execution reaches this code the cmd variable has been copied to st->command, more or less). cachevalidargs, among other things, does the following:
if (!modrootloaded || !i_ddi_io_initialized()) {
       CACHE_DEBUG((DI_ERR,
       "cache lookup failure: I/O subsystem not inited"));
       *error = ENOTACTIVE;
       return (0);
}
That looks pretty promising, as it sets the right error code if the condition holds. modrootloadied is a kernel symbol, so mdb(1) can be used to inspect this value in a running kernel.
# mdb -k
Loading modules: [ unix genunix specfs mac cpu.generic uppc pcplusmp scsi_vhci
ufs sockfs ip hook neti sctp arp usba uhci sd lofs logindmux ptm random crypto
zfs ipc ]
> modrootloaded/X
modrootloaded:
modrootloaded:  1
That's not the culprit. iddiioinitialized() basically returns the value of syseventdaemon_init, so what about that?
# mdb -k
Loading modules: [ unix genunix specfs mac cpu.generic uppc pcplusmp scsi_vhci
ufs sockfs ip hook neti sctp arp usba uhci sd lofs logindmux ptm random crypto
zfs ipc ]
> modrootloaded/X
modrootloaded:
modrootloaded:  1
> sysevent_daemon_init/X
sysevent_daemon_init:
sysevent_daemon_init:           0
Bingo. From the name of the variable the probable name of the not running facility (remember the original error message?) can be deduced: svc:/system/sysevent:default, which, indeed, is not running on the minimal system. Starting it makes cfgadm work.
That wasn't so hard, now was it?
Saturday, March 28. 2009
Login via serial console
Getting a serial console (for login purposes) on OpenSolaris seems to be a two-sided operation. Either it is insultingly simple, or a convoluted mess. The two options I've discovered so far, in order of difficulty.
h3. The easy way
By default Solaris starts a login console on /dev/console, whatever that happens to be at a given moment. Passing -B console=ttya on the kernel command line (via GRUB) will change the primary system console to the first serial port in the system (what Linux calls ttyS0), automagically creating a login prompt there when the system has finished booting.
h3. The hard way
Assuming that for whatever reason /dev/console is not supposed to be on ttya, things move into twilight territory.
Historically a getty was spawned from inittab, and that was it. Sometime in the past Solaris changed this behaviour to a more complicated scheme.
Login processes are handled by the Service Access Controller (sac(1M)), which handles port monitors. Port monitors bind services to ports, for example ttymon(1M), which handles baud rates and spawning the login process. I have to admin that I have not completely understood the architectural design behind all this. As far as I was able to deduce from the manual pages for pmadm(1M), ttyadm(1M) and sacadm(1M) the default setting ought to produce a login prompt on the first two serial ports. Alas, it does not.
It looks like ttymons are no longer handled by SAC, no matter what the documentation says, but are instead spawned directly by SMF, specifically by svc:/system/console-login. This SVC has several instances that handle the login prompts on the virtual consoles for VGA. Adding an instance for ttya makes a login prompt appear on the first serial port. The following creates and activates this instance:
# svccfg -f - <Please note that due to the default settings in
/etc/security/loginroot logins are not possible on this terminal.Now I am waiting for one of two things to happen:
- Someone telling me that I've got it all wrong and that there's a better way to do things
- Someone telling me that this is the official way to do it and that it is documented somwhere.
I'm not holding my breath on either one.
Tuesday, March 24. 2009
iSCSI: Opensolaris target, Fedora initiator, with CHAP
For some reason or another finding instructions on how to actually configure iSCSI for a rather simple and common use case (one target on Solaris, one initiator on Fedora, CHAP authentication) seems to be pretty hard.
Either my google-fu is seriously broken today, or everyone except for me considers this to be so easy and obvious that it does not warrant documentation. Which, having done this for the last three hours, I seriously doubt. The Solaris side is actually documented quite well (I primarily used this blog entry by alasdair), the Linux side is lacking. It does not help matters that both sides use identically named tools that work in completely different ways.
So, the deal is as follows:
One OpenSolaris system, acting as iSCSI target (that is the system presenting the storage space).
One Fedora Linux system, acting as iSCSI initiator (that is the system that wants to use the storage space)
Create 100GB storage space on the target and let the initiator connect to this storage space and create a filesystem on in. The connection has to be authenticated one way (the initiator presents credentials to the target).
h3. The Solaris side
The system is running Nevada, the configuration here was done with build snv_110.
First, the iSCSI target software needs to be installed and enabled:
# gkp.pl -d /mnt/Solaris_11/Product SUNWiscsitgtu
# svcadm enable iscsitgt:default
#
The backing store for the iSCSI volumes shall be provided by ZFS:
# zfs create -o canmount=off tank/iscsi
# zfs create -V 100G -o shareiscsi=on tank/iscsi/vol001
# iscsitadm list target -v
Target: tank/iscsi/vol001
    iSCSI Name: iqn.1986-03.com.sun:02:218c35e0-0881-cb4f-d6bd-80e08bdc98d8
    Alias: tank/iscsi/vol001
[...]
#
The iSCSI Name will be different for each created volume. Per default this target will be available via all interfaces and IPs of the machine. Since this is not what I want in this special case the target is bound to a fixed IP by a construct called a Target Port Group Tag. The TPGT used here has the number 1.
# iscsitadm create tpgt 1
# iscsitadm modify tpgt -i 212.51.12.90 1
# iscsitadm list tpgt -v 1
TPGT: 1
    IP Address: 212.51.12.90
# iscsitadm modify target -p 1 tank/iscsi/vol001
# iscsitadm list target -v
Target: tank/iscsi/vol001
[...]
    TPGT list:
            TPGT: 1
[...]
#
In order to secure access to this volume some more the initiator is required to authenticate itself using CHAP before access is granted. To do this three pieces of information are needed:
- The iqn (basically a unique name) of the initiator
- A username
- A password
The initiator used here has an iqn of iqn.2005-03.com.max:01.cb5c4c (see below for the source of this information). The username is lain and the password is iscsipassword for the purpose of this demonstration. The password has to be between 12 and 16 charcters in length and should definitely be something stronger for production purposes.
# iscsitadm create initiator -n iqn.2005-03.com.max:01.cb5c4c lain
# iscsitadm modify initiator --chap-name lain lain
# iscsitadm modify initiator --chap-secret lain
[...]
# iscsitadm list initiator -v
Initiator: lain
    iSCSI Name: iqn.2005-03.com.max:01.cb5c4c
    CHAP Name: lain
    CHAP Secret: Set
# iscsitadm modify target --acl lain tank/iscsi/vol001
# iscsitadm list target -v
Target: tank/iscsi/vol001
[...]
    ACL list:
            Initiator: lain
[...]
#
This concludes the Solaris side of things.
h3. The Fedora side
The system is running Fedora Rawhide, close to the Fedora 11 Beta release at the time of this writing.
On the Linux side iSCSI is handled by the open-iscsi toolchain, packaged as iscsi-initiator-utils in Fedora. To install it:
# yum install iscsi-initiator-utils
[...]
#
Since the system in question is a notebook, and the iSCSI target may not be available at all times, the iSCSI service must be instructed not to connect to configured devices automatically:
# perl -pi -e 's/node.startup.*/node.startup = manual/' /etc/iscsi/iscsid.conf
#
The initiator name mentioned in the Solaris section above can be configured freely on the system. A random value is created during package installation and saved in /etc/iscsi/initiatorname.iscsi:
# cat /etc/iscsi/initiatorname.iscsi
InitiatorName=iqn.2005-03.com.max:01.cb5c4c
#
Be sure the name configured there matches the name defined in the initiator on the Solaris side. Even though a username/password pair was defined on the target credentials are not needed for target discovery (the process by which an initiator asks a target which iSCSI volumes are available):
# iscsiadm -m discovery -t st -p 212.51.12.90
212.51.12.90:3260,1 iqn.1986-03.com.sun:02:218c35e0-0881-cb4f-d6bd-80e08bdc98d8
# iscsiadm -m node
212.51.12.90:3260,1 iqn.1986-03.com.sun:02:218c35e0-0881-cb4f-d6bd-80e08bdc98d8
#
The discovery process has found a single volume exported by the target and added it to the local node list. The iqn matches the value shown above in the Solaris section. Now the CHAP credentials have to be added to the node so the initiator can actually connect to the volume:
# iscsiadm -m node --target 'iqn.1986-03.com.sun:02:218c35e0-0881-cb4f-d6bd-80e08bdc98d8' \
--name 'node.session.auth.authmethod' -v 'CHAP'
# iscsiadm -m node --target 'iqn.1986-03.com.sun:02:218c35e0-0881-cb4f-d6bd-80e08bdc98d8' \
--name 'node.session.auth.username' -v 'lain'
# iscsiadm -m node --target 'iqn.1986-03.com.sun:02:218c35e0-0881-cb4f-d6bd-80e08bdc98d8' \
--name 'node.session.auth.password' -v 'iscsipassword'
# iscsiadm -m node --target 'iqn.1986-03.com.sun:02:218c35e0-0881-cb4f-d6bd-80e08bdc98d8'
node.name = iqn.1986-03.com.sun:02:218c35e0-0881-cb4f-d6bd-80e08bdc98d8
node.tpgt = 1
node.startup = manual
[...]
node.session.auth.authmethod = CHAP
node.session.auth.username = lain
node.session.auth.password = ********
[...]
#
Now the volume can finally be accessed:
# iscsiadm -m node --target 'iqn.1986-03.com.sun:02:218c35e0-0881-cb4f-d6bd-80e08bdc98d8' --login
Logging in to [iface: default, target: iqn.1986-03.com.sun:02:218c35e0-0881-cb4f-d6bd-80e08bdc98d8,
portal: 212.51.12.90,3260]
Login to [iface: default, target: iqn.1986-03.com.sun:02:218c35e0-0881-cb4f-d6bd-80e08bdc98d8,
portal: 212.51.12.90,3260]: successful
#
After some seconds a device node for this volume should appear in /dev/disk/by-path:
# ls /dev/disk/by-path/
ip-212.51.12.90:3260-iscsi-iqn.1986-03.com.sun:02:218c35e0-0881-cb4f-d6bd-80e08bdc98d8-lun-0
[...]
#
The disk is ready to be used.
Monday, March 23. 2009
Using pkgsrc on Opensolaris, Part 3
h3. Initial install
pkgsrc can be obtained in two main ways. The first is via anonymous CVS checkout, the second is via quarterly tarball releases. Since the whole tree is several hundred megabytes (even without sources) and the NetBSD CVS servers are permanently overloaded a tarball is the way to go for the initial install. The tarballs can be found in the NetBSD mirror structure, the main mirror being here. At the time of this writing pkgsrc-2008Q4 is current.
The tarball already contains a pkgsrc directory at the top level, so it has to be unpacked under /usr.
# wget ftp://ftp.netbsd.org/pub/pkgsrc/current/pkgsrc.tar.gz
# gtar -xzf pkgsrc.tar.gz -C /usr
# chown -R builder: /usr/pkgsrc
This will unpack the tarball into the filesystem mounted at /usr/pkgsrc and change the ownership to the build user created earlier.
h3. Patching gcc
Unfortunately the gcc suite as delivered with Solaris has a small flaw, which will cause some packages to be built incorrectly (the most famous example is openssl, which will build but not work afterwards). Fortunately the bug has been tracked down and a bandaid is available here.
This file is a nice little hack in itself as it is a shell script and a C source file at the same time. If executed by a shell this file will be put though gcc three times to produce three object files, which are placed into a directory where the compiler can find them and use them instead of files that were delivered with the compiler.
# bash ./values.c /usr/sfw/bin/gcc
[....]
# ls -l $(dirname $(/usr/sfw/bin/gcc -print-libgcc-file-name))
[...]
-rw-r--r-- 1 root root    763 2009-02-21 17:34 values-Xa.o
-rw-r--r-- 1 root root    763 2009-02-21 17:34 values-Xc.o
-rw-r--r-- 1 root root    763 2009-02-21 17:34 values-Xt.o
#
h3. Bootstrapping
With this particular bug out of the way pkgsrc needs to be bootstrapped. This means that the initial set of programs needed to build further packages (the package management itself and some helper programs) need to be built and installed on the host system. This has to be done as root. In order to find some programs it is necessary to expand the $PATH a bit.
# cd /usr/pkgsrc/bootstrap
# PATH="$PATH:/usr/sfw/bin:/usr/xpg4/bin" ./bootstrap
[....]
#
Bootstrapping will take a while, but it should run though cleanly. Afterwards there should be some files in /usr/pkg and running /usr/pkg/sbin/pkg_info should list a handful of installed packages.
h3. Vulnerabilities and updates
Packages need to be kept up-to-date, for new features as much as for possible vulnerabilites. In the latter department the bootstrap installed two programs to help with identifying such programs.
/usr/pkg/sbin/download-vulnerability-list will fetch a list of vulnerable program versions. Builds of such versions will fail, unless explicitly requested otherwise. For already installed programs there is /usr/sbin/pkg/audit-packages which will identify and list installed vulnerable versions.
Both programs should be used on a regular basis.
Updates of packages (whether due to a vulnerability or not) are best done via CVS. Updates can be done on the whole package tree or on individual subtrees, as needed. Assuming an older installed version the following command will update the whole tree to 2008Q4:
# su - builder
$ cd /usr/pkgsrc
$ cvs up -dPR -rpkgsrc-2008Q4
[...]
$
It's important to check the output of the CVS command for eventual problems, especially if local modifications to packages have been done.
h3. Host tools
There are a number of tools that are used by a large number of packages during the build process. pkgsrc will build all of these from source if necessary, but most of them can be supplied by the host system instead.
Among these tools are
- GNU m4
- GNU make
- GNU gettext
- GNU tar
- Perl
- GNU patch
- unzip
- BISON & FLEX
GNU make and GNU tar are already installed, the rest of the packages can be found on the Solaris install media. The rest can easily be installed:
# gkp.pl -d /mnt/Solaris_11/Product SUNWgm4 SUNWgnu-gettext SUNWgpch SUNWunzip \
SUNWbison SUNWflexlex
[...]
#
Now pkgsrc has to be made aware of these tools in order to use them. The main config file is /usr/pkg/etc/mk.conf. Adding the following statements somewhere above the final .endif will make pkgsrc use the host version of the above mentioned tools instead of building it's own:
# SUNWgm4
TOOLS_PLATFORM.m4=              /usr/bin/gm4
TOOLS_PLATFORM.gm4=             /usr/bin/gm4
# SUNWgmake
TOOLS_PLATFORM.gmake=           /usr/bin/gmake
# SUNWgnu-gettext
TOOLS_PLATFORM.msgfmt=          /usr/bin/gmsgfmt
# SUNWgtar
TOOLS_PLATFORM.tar=             /usr/bin/gtar
TOOLS_PLATFORM.bsdtar=          /usr/bin/gtar
# SUNWgpch
TOOLS_PLATFORM.patch=           /usr/bin/gpatch
TOOLS_PLATFORM.gpatch=          /usr/bin/gpatch
#
TOOLS_PLATFORM.perl=            /usr/bin/perl
# SUNWunzip
TOOLS_PLATFORM.unzip=           /usr/bin/unzip
# SUNWbison
TOOLS_PLATFORM.bison=           /usr/bin/bison
TOOLS_PLATFORM.bison-yacc=      /usr/bin/bison -y
# SUNWflexlex
TOOLS_PLATFORM.lex=             /usr/bin/flex
Tuesday, March 17. 2009
Using pkgsrc on Opensolaris, Part 2
Preparing the system for pkgsrc involves several steps. A compiler has to be installed to bootstrap pkgsrc, and a directory structure has to be prepared in which the files downloaded and generated will be stored. Moreover, it is a good idea to create a special user which will be used to build software.
h3. Compiler environment
The Solaris core installation does not come with a compiler, but a version of GCC 3 can be found on the DVD (3.4.3 in snv_109). pkgsrc will also work with the proprietary Sun compiler suite, but that is beyond the scope here.
In addition to the compiler itself several other programs are needed to get pkgsrc off the ground.
- Binutils (SUNWbinutils)
- GNU Make (SUNWgmake)
- System header files (SUNWhea)
- System libraries (SUNWlibmr, SUNWlibm)
- XPG4 compatible system utilities (SUNWxcu4)
The complete command line for installing all this is
# gkp.pl -d /mnt/Solaris_11/Product SUNWarc SUNWgccruntime SUNWbinutils SUNWgcc \
SUNWgmake SUNWhea SUNWlibmr SUNWlibm SUNWxcu4 SUNWsprot
The compiler is installed into /usr/sfw/bin by default, which is not in the system search path.
h3. Directories and users
By default pkgsrc uses three directories on the system, in which all files are installed.
/usr/pkgfor installed packages/usr/pkgsrcfor the source tree/var/db/pkgfor the package database
There is no good reason to change these defaults here. /usr/pkg and /usr/pkgsrc will get their own ZFS filesystems, while /var/db/pkg will just be a directory.
# zfs create -o mountpoint=/usr/pkg rpool/pkg
# zfs create -o mountpoint=/usr/pkgsrc rpool/pkgsrc
These two commands create two new filesystems on the root pool and set the mount points to the correct directories. The filesystems are automatically mounted and are immediately ready to be used.
Having a special user for building packages instead of using root is a good idea in general. It protects the system from eventual errors in the build system, which might cause files to be written outside the build root (even if those files are completely harmless and not malicious they are a nuisance nonetheless). The build user should also have no special privileges on the system.
# useradd -d /export/home/builder -m -s /usr/bin/bash -c "pkgsrc build user" builder
Thursday, March 12. 2009
Using pkgsrc on Opensolaris, Part 1
Even though Solaris comes with a large selection of software these days (and some of it in recent versions) there still will be software that is not on the install media. In my case the greatest itch was rtorrent.
I was not too keen on the idea of building everything from scratch the classic way (tar; configure; make; make install;), as this makes tracking software versions and removing software somewhat more complicated than I prefer it to be. If there had to be compiling it would have to come with some kind of system that kept track of the various programs it had compiled.
All this sounded a lot like the FreeBSD ports system to me which I found to be unavailable on Solaris. But the general idea was sound, and in the immediate neighbourhood I discovered the NetBSD pkgsrc system.
pkgsrc is what the ports system is to FreeBSD, a directory tree containing files describing the method to build a certain piece of software (dependencies, source files, patches and so on). It is primarily developed for NetBSD, of course, but over the years support for other UNIX like operating systems has been added, allowing the system to build software on non-NetBSD systems. Solaris has been on the list of supported systems for several years now.
pkgsrc is able to build a self-contained software repository on the guest system, including it's own compiler, binutils and all the other utilities needed to build software. Of course it will initially need a compiler supplied by the guest system, but it's not necessary to keep using that compiler. In other words, pkgsrc can pull a complete Münchhausen, if needed.
On the other hand it can be instructed to use the compiler and tools supplied by the guest operating system, if those are available and recent enough, so that just software that the guest system does not supply is built by pkgsrc.
pkgsrc will by default use it's own dedicated directory tree to keep the software built by it and write only a minimum amount of files into the guest systems file system space. Getting rid of pkgsrc can be as simple as removing three directories (the source tree, the binary tree and the package database tree).pkgsrc also builds it's own package management tools that allow clean deinstallation of it's packages.
Wednesday, March 11. 2009
Building an OpenSolaris storage - Software, Part 6
Since I tend to forget these things, here's a short list showing various package management tasks.
|_. Task |_. RPM |_. pkg (Solaris) |
| List all installed packages | rpm -qa | pkginfo |
| Show all files belonging to an installed package | rpm -ql [package] | pkgchk -l [package] | grep Pathname |
| Find package owning a file | rpm -qf [filename] | pkgchk -l -p [filename] |
Friday, March 6. 2009
Building an OpenSolaris storage - Software, Part 5
Some releases ago Solaris introduces a Role Bases Access System (details and introduction here). The upshot of this is that Profiles can be attached to a user account, giving this account elevated privileges for some tasks.
The main administrator account should probably be able to execute all command with root privileges. Linux/BSD systems use sudo for this, Solaris has pfexec. From a high level standpoint those two commands serve much the same purpose.
Almost all tutorials about pfexec will mention the "Primary Administrator" profile, which will give an account the permissions to execute every command as root. The rub is that a (reduced) Solaris install does not contain this profile. Instead, it is hidden in the SUNWwbcor package. It has to be installed separately.
# gkp.pl -d /mnt/Solaris_11/Product SUNWwbcor
[...]
# usermod -P'Primary Administrator' admin
# su - admin
$ id
uid=500(admin) gid=100(users)
$ pfexec id
uid=0(root) gid=0(root)
The admin user can now execute every command as root without needing the root password (or any password, for that matter) simply by prefixing it with pfexec
Building an OpenSolaris storage - Software, Part 4
After the newly installed system has booted for the first time it is time to make Solaris a bit more homely. This involves installing a number of packages, which brings me neatly to the first thing that annoys me (and probably a lot of other people used to current Linux distributions): the package management is an absolute mess.
Most Linux distributions take a two-tiered approach to package management: there are low level tools that allow installation of one or more packages, reading from a local filesystem, removal of packages, listing information about packages and so on. RPM is an example of this, as is DPKG.
Then there are high level tools that know about local and remote collections of packages, can resolve dependencies for package installation and removal. YUM, APT and PackageKit are examples of these tools.
Unless something is severely broken the high level tools are used for package management in the usual cases. Noone actually wants to do all the manual dependency solving and package downloading themselves, that's what computers are for, after all.
Unfortunately all Solaris provides are tools of the first category. While I understand that changing the low level tools is impossible for binary compatibility reasons I do not see a reason why high level tools for handling all the grunt work are not being provided.
The logical response to this dilemma is to write a rudimentary high level tool which takes away some of the pain. My version is written in Perl (which, astoundingly, is part of the core install, and not even insultingly old). Currently all it can do is install packages. It relies on the dependency information in the Solaris packages, which is spotty at best.
So, lets make this system a bit more habitable.
mount -F nfs 10.200.200.1:/jumpstart /mnt
gkp.pl -d /mnt/Solaris/Product SUNWgcmn SUNWwgetr SUNWwgetu SUNWntpr SUNWntpu SUNWgtar \
SUNWsshcu SUNWsshr SUNWsshu SUNWsshdr SUNWsshdu SUNWbash SUNWless SUNWdoc SUNWman \
SUNWgnu-coreutils SUNWtoo
Among other things this will install
- Bash
- wget
- GNU tar
- SSH server and client
- man pages
h3. Setting the root shell
I probably won't make many friends here, but I like bash. And I also like a root shell I can actually work with. So, root gets a bash. Contrary to what other people might say this is an absolutely harmless change on modern Solaris systems. /bin/sh still points to ksh (and that should not be changed), but the shell of the root account is not important to the work of the system itself. And should the root shell be unavailable or broken Solaris will fall back to /bin/sh.
usermod -s /usr/bin/bash root
h3. Configuring SSH
Working on the console itself is tedious, so getting SSH up and running is important. Even though the packages are installed they are not configured or enabled yet.
First, though, I usually define a special group to which accounts which are allowed to ssh into the system are added. Then the keys are generated, and finally ssh is enabled.
groupadd sshusers
echo "AllowGroups sshusers" >> /etc/ssh/sshd_config
/lib/svc/method/sshd -c
svcadm enable ssh
h3. Security settings
By default Solaris creates crypt encrypted passwords. While this is compatible with almost every UNIX system since the later jurassic, it is certainly no longer up to date. The following will change the password algorithm to the BSD (and Linux) compatible version of MD5.
perl -pi -e 's/^CRYPT_DEFAULT=.*/CRYPT_DEFAULT=1/' /etc/security/policy.conf
This will not change existing accounts. Only newly created password hashes are affected. This means that the root password should be set again, to create a new hash.
h3. Adding normal users
Working as root is a bad idea, so adding normal users is the order of the day to do normal work on the system. I prefer to have a special group containing all normal users, so this has to be added as well.
In addition, giving every user a separate ZFS filesystem as home directory is a good idea. The dataset rpool/export/home does already exist, the installer created it.
Since this is going to be a storage system without a lot of users there is no big problem with /export/home living on rpool.
groupadd users
zfs create rpool/export/home/admin
useradd -g users -G sshusers -d /export/home/admin -s /usr/bin/bash \
 -c "Admin User" -m admin
chown -R admin:users ~admin
The user becomes a member of the sshusers group and can thus login via SSH (after a password is set).
Sunday, February 22. 2009
Building an OpenSolaris storage - Software, Part 3
Installing Solaris can be a strange experience for someone who is only used to modern time Linux installers. Yes, there is a graphical installer, but it consists of little more than an X windows which basically asks the same questions as the text mode installer. Unless you already know how to install Solaris, and what the installer expects of you some of the questions and dialogs seem a little strange.
Due to Solaris' focus on binary compatibility some of the defaults don't make that much sense anymore, either, but changing them to more sensible defaults would cause confusion, or so it seems.
For the install on the storate system, though, most of the defaults are sensible, and since Solaris does not have to share any disks withother operating systems the partitioning process is not that painful, either.
The first question the installer asks (always in text mode) is about the general installaton mode the user wishes to perform (roughly graphical/text based or rescue shell). Interactive/text mode (option 4) is usually fine.
If the system has booted from the network the installer will not ask about IP configuration for the network cards but assume DHCP for IPv4.
The question about the name resolution service is one of the odd quirks in the installer. The naming service defaults to NIS, which is probably wrong for almost any new installation on this planet. Usually DNS is the right choice here. The installer will then ask for the DNS server IPs and default domains. If the installer can not resolve the current machine IP via these nameservers it will explicitly ask for confirmation that the data is really right.
The default answers for the next questions (Kerberos/NFS4) are sensible in the usual cases.
When asked for the file system to use for the root filesystem the default is UFS. Change it to ZFS. I prefer to use separate datasets for / and /var, but that is a matter of personal taste.
The (almost) final question is for the amount of packages to be installed. The installer offers five predefined groups, ranging from several hundred to almost three gigabytes of installed data. Selecting the smallest set will do fine here, the system will boot, have network and NFS client support, which is enough to get at the rest of the packages to install later.
That's it, basically. The installer will now copy the files to the boot disk, prepare the bootloader and restart the system.
Monday, February 16. 2009
Building an OpenSolaris storage - Software, Part 2
After solving the cache issue on the MSI board it was time to install the OS for real. I had planned to do the install via the network, for two reasons.
- To avoid having to burn a DVD for this
- To find out how to do it
Installing Solaris via the network has been supported for a very long time, and Solaris being what it is the process has not changed very much. That means that there are some quirks in it.
Because this was the first Solaris installation in my network some non-Solaris machine had to take over the job of providing the various services needed for an installation. The job was delegated to my notebook running Linux.
The following services are needed to install Solaris over the network: * A DHCP server * A TFTP server * An NFS server
In addition to that some software: * A Solaris medium (obviously) * A bootloader (I'll use SYSLINUX, at least version 3.73 required)
First and foremost, though, the network card in the system that is to be the target of the installation needs to support PXE. PXE is a method that defines a way for a network card BIOS to obtain an IP address via DHCP and load a piece of software from the network, which is then executed by the system. In addition PXE provides a handful of library functions that give the just loaded software a way to talk to the network itself (to load even more software, for example).
Most modern network cards and BIOSes support PXE and booting from the network. If this is not the case the nice people over at etherboot.org have a large library of network card specific code that can be booted via a floppy disk or a bootable CDROM which will provide the network card with the appropriate capabilities.
A dedicated network will be used for the installation, namely 10.200.200.0/24. The install server has the IP 10.200.200.1.
h3. Preparing the tftpboot directory
The TFTP server will serve it's files from the /tftpboot directory. The following structure is expected there:
/tftpboot/
|-- mboot.c32
|-- pxelinux.0
|-- pxelinux.cfg
|   `-- default
`-- solaris
    |-- platform
    |   `-- i86pc
    |       `-- kernel
    |           `-- unix
    `-- x86.miniroot
The mboot.c32 and pxelinux.0 files come from the SYSLINUX bootloader package. pxelinux.cfg/default is the configuration file for the PXE bootloader. It is loaded and read when pxelinux.0 runs. It has the following content:
DEFAULT jumpstart
LABEL jumpstart
  KERNEL mboot.c32
  APPEND -solaris solaris/platform/i86pc/kernel/unix -v -m verbose -B install_media=10.200.200.1:/jumpstart  --- solaris/x86.miniroot
The parameters describe the path of the kernel image under the TFTP server root (solaris/platform/i86pc/kernel/unix), request a verbose startup (-v -m verbose), select the install method, server and path (-B install_media=10.200.200.1:/jumpstart) and the describe the path to the miniroot which contains the installer (solaris/x86.miniroot).
The two files in the solaris directory are found on the Solaris install media under the /boot directory in a similar directory structure. It is important that this structure is retained (even if it seems a bit pointless).
h3. Preparing the DHCP server
There is not much to this, really, all that is required (besides the obvious IP address and netmask) is the IP address of the TFTP server and the filename of the SYSLINUX bootloader in the TFTP directory structure. The complete config file (for the ISC DHCP server) looks like this:
subnet 10.200.200.0 netmask 255.255.255.0 {
    range 10.200.200.128 10.200.200.200;
    option routers 10.200.200.1;
    option subnet-mask 255.255.255.0;
    next-server 10.200.200.1;
    filename "/pxelinux.0";
}
h3. Preparing the NFS server
There are several ways to present the contents of the install media via NFS, but for this install the method that worked best for me was to simply mount the ISO into a directory and share that via NFS.
# mkdir /jumpstart
# mount -o ro,loop /tmp/nv105.iso /jumpstart
The entry in /etc/exports looks like this:
/jumpstart *(ro,no_subtree_check,sec=sys)
h3. Putting it all together
That should be it, basically. If the machine is turned on and set to boot from the network the following chain of events will take place, provided all goes well:
- The PXE BIOS sends DHCP requests
- The DHCP server answers the requests, assigning an IP address and the TFTP server information
- The PXE BIOS loads
/pxelinux.0from the TFTP server and executes it /pxelinux.0loads/pxelinux.cfg/defaultfrom the TFTP server and interpets it as a config file/pxelinux.0loads the Solaris kernel and miniroot from the TFTP server and runs the kernel- The Solaris kernel boots, mounts the miniroot and starts the installer and re-requests the DHCP address
- The installer mounts the NFS directory